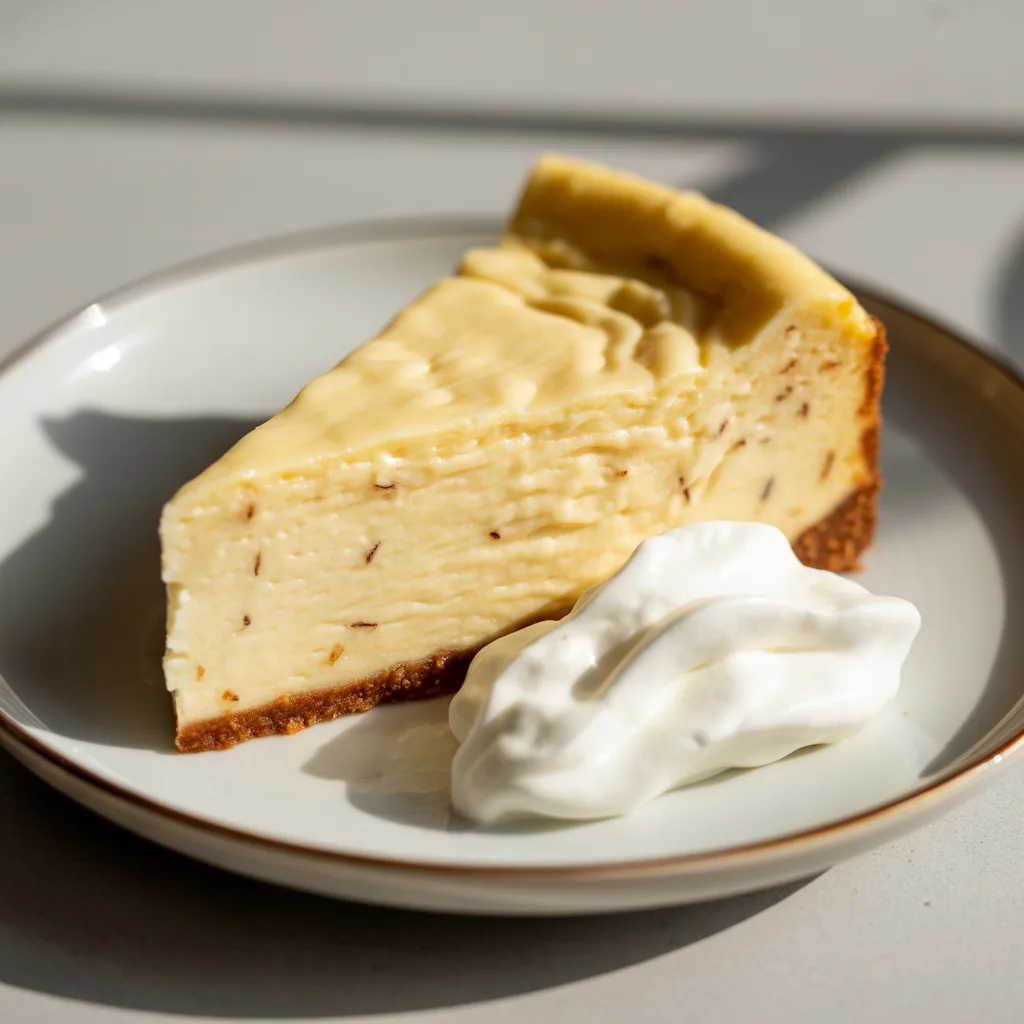
Is there anything more comforting than a slice of cheesecake that’s just perfectly creamy? You know the kind—silky smooth, rich, and tasting like pure, uncomplicated vanilla. I set out to create just that, a Creamy Vanilla Bean Cheesecake with Silky Smooth Texture that feels fancy but is surprisingly achievable for any home cook. No fancy culinary degree required, just a little patience and a whole lot of love.
Why You’ll Love This
This recipe is a dream for a few big reasons. First, that texture. We’re talking melt-in-your-mouth, cloud-like creaminess that’s just… so good. Second, it’s a real showstopper. Slice into it and you’ll reveal those beautiful little specks of real vanilla bean. And honestly, the process is pretty therapeutic. There’s something so satisfying about creating something this beautiful from a few simple ingredients. It’s the kind of dessert that makes any Tuesday feel like a celebration.
Equipements Needed
- A 9-inch springform pan: This is non-negotiable for getting that perfect, clean slice.
- Electric mixer (handheld or stand): You’ll need some power to get that filling super smooth.
- Large mixing bowls: For combining everything without making a mess.
- Measuring cups and spoons: For accuracy, honey. Baking is a science.
- Spatula: To scrape every last bit of that delicious batter into the pan.
- Aluminum foil: To create a water bath that protects our precious cheesecake from cracking.
Ingredients
For the Crust:
- 2 cups graham cracker crumbs: Forms the sweet, sturdy base for our cheesecake.
- 1/2 cup unsalted butter, melted: Binds the crumbs together for that perfect crunch.
- 1/4 cup granulated sugar: Adds just the right amount of sweetness to the crust.
For the Filling:
- 4 packages (8 oz each) full-fat cream cheese, room temperature: The star of the show, giving us that rich, classic flavor.
- 1 1/4 cups granulated sugar: Sweetens the filling without making it grainy.
- 1 cup sour cream, room temperature: The secret to that incredible, tangy, creamy texture.
- 4 large eggs, room temperature: Helps set the cheesecake and adds structure.
- 1/4 cup all-purpose flour: A little bit helps prevent cracks and gives a velvety finish.
- 1 tablespoon pure vanilla extract: For a wonderful background flavor.
- The seeds from 1 whole vanilla bean: This is what gives it that gorgeous, speckled aesthetic and deep vanilla taste.
- A pinch of salt: Balances all the sweetness perfectly.
Step By Step
- Heat your oven to 325°F. Wrap the outside of your springform pan tightly with a double layer of heavy-duty aluminum foil. This is our trick to keep the water bath from seeping in.
- Make the crust by mixing the graham cracker crumbs, melted butter, and sugar in a bowl. Press the mixture firmly and evenly into the bottom of the prepared pan. Bake for 10 minutes, then set it aside to cool slightly.
- In a large bowl, beat the room-temperature cream cheese with an electric mixer on medium until it’s completely smooth. This is key—no lumps allowed! Gradually beat in the sugar until it’s fully incorporated.
- Beat in the sour cream, vanilla extract, and the seeds from the vanilla bean. Scrape down the sides of the bowl to make sure everything is mixing evenly.
- Add the eggs one at a time, mixing on low speed just until the yolk disappears after each addition. Overmixing at this stage adds too much air and can cause cracks. Finally, mix in the flour and pinch of salt until just combined.
- Pour the filling over the cooled crust. Place the springform pan into a larger roasting pan. Carefully pour hot water into the roasting pan until it comes about halfway up the sides of the springform pan. This gentle, steamy heat is the secret to that silky smooth texture.
- Bake for about 1 hour to 1 hour 15 minutes. The edges should be set, but the center will still have a slight jiggle when you gently shake the pan. Turn off the oven, crack the door open with a wooden spoon, and let the cheesecake cool slowly inside for one hour. This gradual cooling is another crack-prevention hero.
- Remove the cheesecake from the water bath, take off the foil, and let it cool completely on a wire rack. Then, cover it and refrigerate for at least 6 hours, but preferably overnight. I know it’s hard to wait, but trust me, it’s worth it.
Cheesecake Aesthetic Tips
Let’s talk about making this beauty look as good as it tastes. For a flawless top, the water bath is your best friend. For a super clean slice, dip your knife in hot water and wipe it dry between each cut. When it comes to cheesecake decoration, keep it simple. A drift of lightly sweetened whipped cream, a few fresh berries, or even a drizzle of salted caramel lets the vanilla bean speckles shine. Sometimes, the simplest toppings make the biggest impact for your cheesecake desserts.
Variations & Substitutions
This recipe is a fantastic base for all sorts of fun twists. Love chocolate? Swirl in some melted dark chocolate before baking for a marbled effect. For a Biscoff cheesecake vibe, simply swap the graham crackers for crushed Biscoff cookies in the crust. If you’re thinking about mini desserts, this recipe bakes up beautifully in a muffin tin lined with parchment liners—just reduce the baking time to about 20-25 minutes. For a gluten-free version, use gluten-free graham-style crackers. And if you can’t find a vanilla bean, you can use an additional tablespoon of high-quality vanilla extract, though you’ll miss those lovely specks.
Storage & Reheating
This cheesecake stores like a dream. Keep it covered tightly in the refrigerator for up to 5 days. It also freezes beautifully for up to 2 months. To freeze, place the whole cooled cheesecake (or individual slices) on a baking sheet until solid, then wrap it tightly in plastic wrap and foil. Thaw overnight in the fridge before serving. There’s no need to reheat cheesecake, but taking it out of the fridge about 15-20 minutes before serving takes the chill off and makes it even creamier.
Serving Ideas & Pairings
A simple slice of this Creamy Vanilla Bean Cheesecake is heavenly on its own. But if you want to dress it up for a party, try pairing it with a bright, tart raspberry coulis or a warm cherry sauce to cut through the richness. A cup of strong black coffee is my absolute favorite pairing. And for a real showstopper, consider using this cheesecake as a layer in a cheesecake cake recipe, stacked with layers of dense chocolate cake. Now that’s a dessert people will talk about for weeks.
Frequently Asked Questions
Can I make this a no-bake cheesecake?
This particular recipe is designed for baking, which gives it that classic, dense-yet-creamy texture. If you’re looking for no-bake cheesecake recipes, you’ll want to seek out one that uses gelatin to set. They’re great, but they have a different, lighter consistency.
Why is room temperature ingredients so important?
Room temperature ingredients blend together smoothly and evenly, which is the entire secret to avoiding a lumpy filling. If your cream cheese is cold, you’ll end up with little bits of un-incorporated cheese in your batter.
Do I really need a water bath?
Honestly? For this best cheesecake recipe, yes. It’s the single most important step for preventing cracks and achieving that dreamy, silky smooth texture. It sounds fussy, but it’s just pouring water into a pan—you can do it!
What are some easy cheesecake toppings?
Fresh fruit, a simple berry sauce, whipped cream, chocolate shavings, or even a sprinkle of crushed cookies are all fantastic and easy cheesecake toppings. Let your mood be your guide!