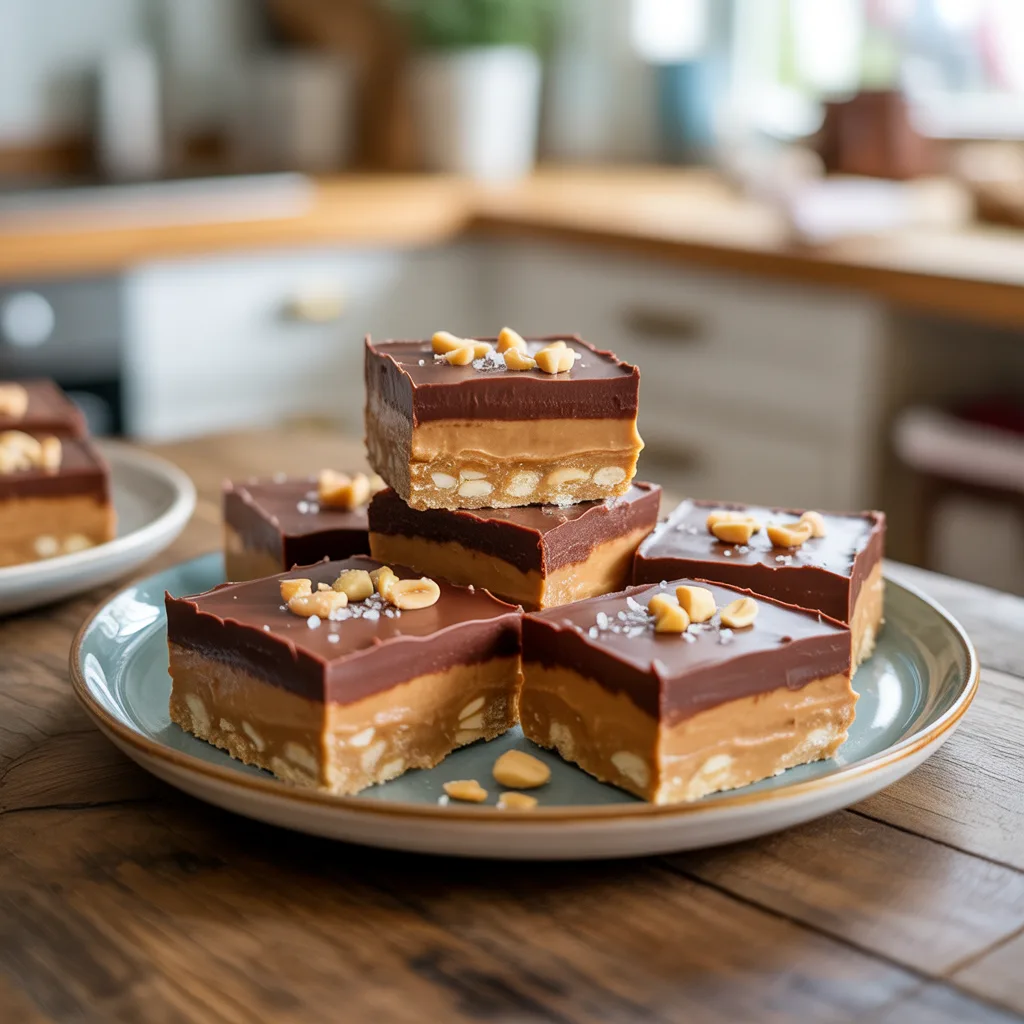
Well, here we are again, smack in the middle of the holiday hustle. The calendar’s packed, the to-do list is a mile long, and the last thing you need is a complicated dessert recipe demanding oven space and a sink full of dishes, right? What if I told you the most crowd-pleasing treat on your holiday table this year could be whipped up in minutes with absolutely no baking required? These No-Bake Peanut Butter Chocolate Christmas Bars are my little secret for pulling off a spectacular dessert with minimal effort. They’re the perfect answer when you need Simple Christmas Desserts that feel special without the stress. Honestly, is there a more beloved duo than peanut butter and chocolate during the holidays?
Why You’ll Love This
You’ll love this recipe because it’s the ultimate cheat code for the busy holiday season. Seriously. First, there’s no oven involved, which is a blessing when you’re trying to roast a turkey and bake rolls simultaneously. The base comes together in one bowl, and the topping is a simple melt-and-pour situation. We’re talking about a rich, fudgy base with a creamy peanut butter layer, all smothered in a glossy chocolate glaze. It’s a decadent treat that feels indulgent and festive, but it’s so, so easy. Plus, you can make them way ahead of time, which is a game-changer for planning your Holiday Treats menu.
Equipements Needed
- 8×8 Inch Baking Pan: The perfect size for nice, thick bars.
- Parchment Paper: Non-negotiable for easy removal and clean slices.
- Medium Mixing Bowl: For bringing the crust together.
- Small Saucepan or Microwave-Safe Bowl: For melting the chocolate and butter.
- Spatula: To scrape every last bit of that delicious peanut butter filling.
- Measuring Cups and Spoons: For getting those ratios just right.
Ingredients
- For the Crust: 2 cups graham cracker crumbs (about 15 full sheets) – creates that classic, sturdy base.
- For the Crust: 1/2 cup (1 stick) unsalted butter, melted – binds the crumbs together.
- For the Crust: 1/4 cup granulated sugar – adds a little sweetness to the base.
- For the Filling: 1 cup creamy peanut butter – the star of the show, use a standard brand like Jif or Skippy for best texture.
- For the Filling: 1/2 cup (1 stick) unsalted butter, softened – makes the filling light and creamy.
- For the Filling: 1 teaspoon vanilla extract – enhances all the flavors.
- For the Filling: 1 1/2 cups powdered sugar – sweetens and thickens the peanut butter layer perfectly.
- For the Topping: 1 cup semi-sweet chocolate chips – delivers that smooth, classic chocolate flavor.
- For the Topping: 1/4 cup creamy peanut butter – helps the topping set with a beautiful sheen and prevents cracking.
Step By Step
- Line your 8×8 pan with parchment paper, letting the edges hang over the sides for easy lifting later.
- In your medium bowl, stir together the graham cracker crumbs, melted butter, and granulated sugar until it resembles wet sand.
- Press this mixture firmly and evenly into the bottom of your prepared pan. I like to use the bottom of a measuring cup to get it really packed down. Pop this in the fridge to set for 10 minutes.
- While the crust chills, make the filling. In the same bowl (see? fewer dishes!), beat the softened butter, 1 cup of peanut butter, and vanilla extract together until smooth.
- Gradually mix in the powdered sugar. It might be thick, but keep going until it’s fully incorporated and smooth.
- Spread the peanut butter filling evenly over the chilled crust. A small offset spatula works wonders here, but a butter knife does the job too.
- Now for the topping! Combine the chocolate chips and the remaining 1/4 cup of peanut butter in a microwave-safe bowl. Heat in 30-second bursts, stirring each time, until melted and smooth. Alternatively, you can melt them together in a small saucepan over low heat, stirring constantly.
- Pour the chocolate mixture over the peanut butter layer and gently spread it to the edges.
- Refrigerate the bars for at least 2 hours, or until completely firm. This is the hardest part—waiting!
- Use the parchment paper to lift the whole slab out of the pan. Place it on a cutting board and slice into bars with a sharp knife. For clean cuts, wipe the knife blade clean between slices.
Variations & Substitutions
This recipe is wonderfully adaptable. For a different crust, try using crushed vanilla wafers or Oreos (without the filling). If you have a nut allergy, sunflower seed butter is a great swap for the peanut butter—just know the color will be a bit darker. Feeling fancy? Stir a handful of chopped peanuts into the peanut butter layer for some crunch. Or, while the chocolate topping is still wet, sprinkle on some festive holiday sprinkles, a dusting of flaky sea salt, or even crushed candy canes for a real Christmas Treats Easy vibe.
Serving Ideas & Pairings
These bars are rich, so I like to cut them into smaller squares for a party platter. They’re the perfect finger food for your Christmas Party Desserts spread. Serve them alongside a pot of coffee or a glass of cold milk to balance the sweetness. For a truly epic holiday dessert board, pair them with some simple sugar cookies and maybe a peppermint bark. So good.
Storage & Reheating
Store these bars in an airtight container in the refrigerator for up to one week. They also freeze beautifully for up to 3 months. Just wrap the whole block or individual bars tightly in plastic wrap and then in foil before freezing. Thaw in the fridge overnight. There’s no need to reheat—they are meant to be enjoyed cold straight from the fridge!
Frequently Asked Questions
- Q: Can I use natural peanut butter?
A: I don’t recommend it for this recipe. The oil separation in natural peanut butter can make the filling greasy and prevent it from setting properly. Stick with a conventional, stabilized brand for the best results. - Q: My chocolate topping is too thick to spread. What happened?
A: You might have overheated it. If it’s thick and clumpy, add a tiny teaspoon of neutral oil (like vegetable or coconut) and stir vigorously. It should loosen right up. - Q: How far in advance can I make these for Christmas?
A: They are the ultimate make-ahead Holiday Desserts Christmas dream! You can easily make them 2-3 days before you need them. In fact, I think they taste even better after the flavors have mingled for a day. - Q: Are there any other Christmas Food Ideas that are this easy?
A: Absolutely! Think no-bake cheesecakes, simple fudge, or a festive popcorn mix. Sometimes the best Xmas Desserts are the ones that don’t require turning on the oven.
When you need a dessert that’s guaranteed to bring smiles without adding to your holiday chaos, these No-Bake Peanut Butter Chocolate Christmas Bars are the answer. They’re the kind of easy, beloved treat that lets you spend less time in the kitchen and more time making memories.