Rich, velvety chocolate goodness without ever turning on the oven—now that’s my kind of dessert. With just a handful of simple ingredients and a few easy steps, this recipe comes together beautifully, even on your busiest days. Whether it’s a weeknight treat or a last-minute gathering, these little cups always feel like something special.
Why You’ll Love This No-Bake Chocolate Mousse Cups
- No oven needed: Perfect for warm days or when you just don’t feel like baking.
- Simple ingredients: Everything here is easy to find and likely already in your kitchen.
- Quick to prepare: The steps are straightforward and beginner-friendly.
- Light and creamy texture: That whipped chocolate mixture turns out soft and fluffy every time.
- Customizable topping: Dress it up with berries or chocolate depending on what you have.
- Great for individual servings: These little cups feel fun and personal for guests or family.
Ingredients You’ll Need
This recipe keeps things nice and simple, just the way I like it. Each ingredient plays an important role in building that smooth, chocolatey dessert with a soft layered base.
- 1 cup dark chocolate chips: This is the heart of the mousse, giving it that deep chocolate flavor and structure once melted. The amount ensures a rich consistency without turning too dense.
- 1 cup heavy whipping cream, divided: Using it in two parts is key—half melts the chocolate into a smooth base, while the other half gets whipped to create that airy, fluffy texture.
- 2 tbsp powdered sugar: Adds just enough sweetness to balance the dark chocolate and helps stabilize the whipped cream.
- 1 tsp vanilla extract: Brings a soft, warm flavor that rounds out the chocolate beautifully without overpowering it.
- Crushed biscuits or brownies for base: This gives the dessert a little texture contrast—soft mousse on top and a slightly crumbly base underneath.
- Fresh berries or shaved chocolate to top: A simple finishing touch that adds freshness or an extra layer of chocolate flavor right at the end.
Now don’t worry if you’ve never made mousse before—I’ve had my fair share of kitchen mishaps, and this one is about as forgiving as it gets.
How to Make No-Bake Chocolate Mousse Cups
I love how this recipe comes together without any fuss—just a little mixing, a little folding, and you’re on your way to something downright comforting and delicious.
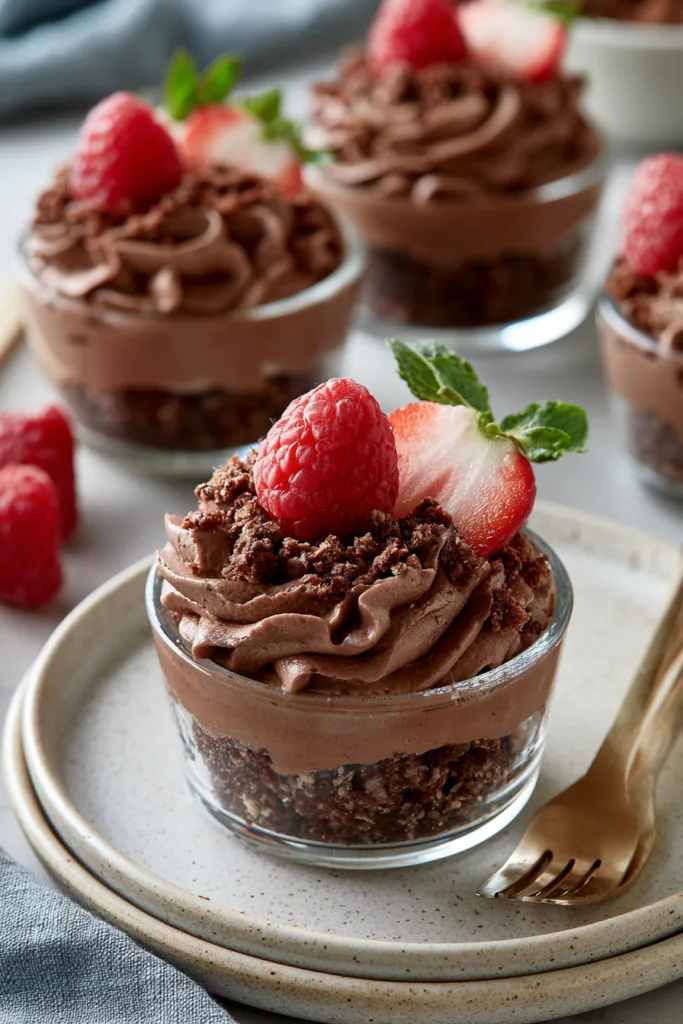
- Melt the chocolate chips with ½ cup of warm cream, stirring until smooth, then set it aside to cool for 10 minutes so it blends properly later.
- Whip the remaining ½ cup of cream with powdered sugar and vanilla extract until stiff peaks form—this is what gives the mousse its light, airy texture.
- Fold the whipped cream gently into the cooled chocolate mixture until everything is combined and fluffy, taking care not to deflate it.
- Layer crushed biscuits or brownies into the bottom of your serving glasses to create a soft, slightly crumbly base.
- Spoon or pipe the mousse over the base, then chill for 1 hour before topping with fresh berries or shaved chocolate.
Tips for the Best No-Bake Chocolate Mousse Cups
- Cool the chocolate first — Letting the melted chocolate sit for the full 10 minutes helps it blend smoothly with the whipped cream.
- Whip to stiff peaks — This ensures the mousse holds its shape and doesn’t turn runny.
- Fold gently — Mixing too aggressively can flatten the mousse and affect the texture.
- Layer evenly — Keeping the biscuit or brownie base level helps each spoonful have the right balance.
- Chill fully — Giving it the full hour in the fridge helps the mousse set properly.
Storage & Make-Ahead Tips
- Fridge: Store the mousse cups covered in the refrigerator for up to 3–4 days. The texture stays creamy, and the flavors settle in nicely.
- Freezer: You can freeze these for up to 3 months. Let them thaw in the refrigerator before serving so the texture returns to its soft, mousse-like consistency.
- Make-ahead: These are perfect for prepping ahead—just assemble and chill, then add the toppings right before serving for the best presentation.
What to Serve With No-Bake Chocolate Mousse Cups
These mousse cups are rich and satisfying on their own, but pairing them with something light or simple can really round things out nicely.
- Fresh fruit platters
- Light tea or coffee
- Simple butter cookies
- Whipped cream on the side
- Vanilla-flavored drinks
There’s just something about a dessert like this that feels like a little treat at the end of a long day—easy, comforting, and made with love.
Frequently Asked Questions
Q: Can I use milk chocolate instead of dark chocolate chips?
Yes, you can swap in milk chocolate chips if that’s what you have on hand. Keep in mind it will result in a sweeter mousse since dark chocolate has a deeper, less sweet flavor. The texture will stay similar, but the overall taste will be a bit lighter and more dessert-like.
Q: What does “stiff peaks” mean when whipping cream?
Stiff peaks form when the whipped cream holds its shape firmly when you lift the whisk. It shouldn’t collapse or look soft. This step is important because it gives the mousse its structure and helps it stay fluffy once combined with the chocolate.
Q: Why do I need to let the chocolate cool before mixing?
If the chocolate is too warm, it can affect the whipped cream when you combine them. Letting it cool for the full 10 minutes helps everything blend together smoothly and keeps the mousse light instead of dense.
Q: Can I skip the base layer?
You can, but that layer adds a nice contrast in texture. The creamy mousse pairs really well with the crushed biscuits or brownies, giving each bite a little balance instead of being all soft.
Q: How do I know if I folded the mixture correctly?
The final mixture should look smooth and fluffy without streaks of plain whipped cream or thick chocolate. It should feel light when you stir it, not heavy or overly dense.
Q: Can I make this for a party?
Absolutely. These mousse cups are great for gatherings since they can be made ahead and served in individual portions. They’re easy to dress up with toppings and look a little fancy without much extra effort.
Q: What kind of serving glasses work best?
Any small glass or dessert cup works just fine. Clear glasses are especially nice because they show off those layers, but the recipe itself doesn’t depend on a specific type.

No-Bake Chocolate Mousse Cups
Ingredients
Method
- Melt chocolate chips with 1/2 cup warm cream and stir until smooth, then let cool for 10 minutes.
- Whip remaining 1/2 cup cream with powdered sugar and vanilla extract until stiff peaks form.
- Fold whipped cream gently into the cooled chocolate mixture until fluffy and combined.
- Layer crushed biscuits or brownies into the bottom of serving glasses.
- Spoon or pipe mousse on top, chill for 1 hour, then add fresh berries or shaved chocolate before serving.